Getting the equipment
Collecting all the rest of the equipment together for Railroad Photography is not as expensive as you might think. One tripod for the camera, this is a necessity, otherwise camera shake on those long exposures is going to show. These can be bought for as little as Ł25 (NEW) or if you are lucky for about Ł7 second hand at camera exchange shops, also the rest of the items listed below can be bought second hand. (except the floods) You require three (or at least two) photoflood reflector lamps and some sort of clamps, ( similar to the clamps used on a wandering lamp when working on your car engine at an awkward time) better still if you can afford it, two or three tripods to hold the reflectors. Now all that is required are three (or two) 5OOwatt photofloods, or if you were like me and did at one time standard 8mm CINE photography, you might still have those 1OOO watt lights left over somewhere.
There is a difference in colour temperatures with 5OO watt and 1OOO watt lamps, for colour photography but -- more on THIS -laterIf some of you have not got a 35mm Camera, but have instead a two and a quarter (12O) camera, then this is also fine to work with. In fact, because the negatives are larger, the quality is better to a degree, depending on the camera of course.
Some 12O's like the Mamiya C22O has also apart from twin lenses, have the facility to change lenses. But, a word of caution when using a 12O up close with twin lenses. Remember that what you see isn't quite what you get, unlike looking through the viewfinder of a 35mm. The best way around this is to measure the distance between the two lenses and after you have focused in on the subject, then raise the camera by that amount by winding up the camera on the tripod and measure the same distance as you wind it up. and you should get what you were looking at inside the camera on film. For normal photographs from about 4 feet onwards, they are okay.The other 12O's that are of the single lens variety can be used as if they were a 35mm. (All text refers to 35mm)
Before we load the camera with a film, here is something you can test for yourself if your camera has a built-in auto shutter speed selector. (If your camera has not got this facility, then all you can do is just read about the test.) With the camera set on AUTO (without a film in the camera) set the f-stop to 22 or 32 which ever is the smallest on your camera lens. Place the camera on the tripod, set the lights to the positions in the drawing.
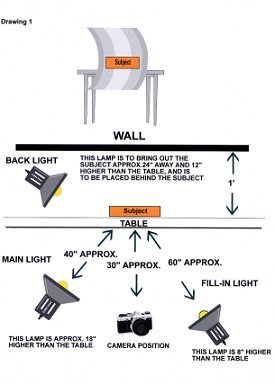
Now, switch on the lights, wind on as if you had a film in the camera, now at the same time as you press the release, look at the second hand on your wristwatch and see how many second's pass-by before the shutter closes again. If the exposure is between one and four seconds, then the camera can handle these few seconds whilst being in auto mode. (If the exposure is over four seconds, then you will have to use the "B" mode, and cable release.) Lets say for example that your camera set on f22 made the full 4 seconds before closing itself, was it 4 seconds or might it have been over 4 seconds for the correct exposure. How do you find out - EASY - turn the f-stop to f16 and do the test again. If it is still a full 4 seconds, turn it to f11 and do it again, and so on until the camera shuts off before the 4 seconds are up. Now then, the little table below is only for 4OO ISO film speed, and is only a guide, but at least you will be able to make a start. Read off the seconds your f- stop made under 4 seconds, and then adjust the time for f22.
| SECONDS | F-STOP |
| 1 to 1.5 | f11 |
| 2 | f11/16 |
| 6 | f22 |
I would advise to bracket the time by half to one second either side, taking three or four photo's at a time, and do not forget to use the penny trick, "WHAT PENNY" you ask, -- read on.
| Auran Website | Database | Articles | Trainz Website |