![]()
![]()
![]()
Driver Setup Tutorial
To follow this Tutorial you can download our Multi-Industry New Tutorial
map from Trainz Exchange. Open the Session named Working Example. Here
you will see the orders set up already for you.
You can issue orders to your Drivers within Surveyor so that they begin
to execute the Commands as soon as you start your Session. This Tutorial
will walk you through the process of setting up orders for a single Driver
using the map you made in the Multi-Industry Tutorial. (You can also open
the Example Session and delete the existing orders and follow these instructions).
Move your cursor to the top of your screen in Surveyor and you will see
two icons on the Menubar appear. The lefthand icon is the Driver Quickstart
icon and the righthand icon is to Edit Session Rules. Click on the Edit
Session Rules icon. The window that displays shows sthe default set of
Rules used in each Session. A Session is made up of a set of Rules (instructions),
trains and industry configurations. You can have multiple Sessions per
Route.
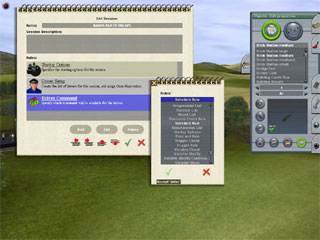
The Rule we are interested in here is the Driver Setup Rule. This Rules
allows you to allocate Drivers to trains and to give the Drivers Commands
to carry out during your Session. (Commands are also called orders). Click
on the Driver Setup Rule and it will highlight in blue. Then click Edit
to open up the Edit Rule window. If you have just created a new map, each
train you have placed on the track will have been issued a default Driver.
You can change theseby clicking on their photo and you can also enter
your own names for each Driver.
Once you have begun editing this Rule, you will need to manually add Drivers
to each new train you place on the tracks. To issue Commands to your Driver,
simply R-Click on the green arrow in the display window and a list of
Commands appears. Generally you use a Wait command to hold the train in
its starting position, followed by a Drive To command, then a Load or
Unload command. You can also use Drive to Trackmark to get a train to
stop at a Trackmark (use this in conjunction with Wait to get him to stay
there longer than a millisecond). If you wish a Driver to follow a particular
path, place Trackmarks along that path and give him Drive Via Trackmark
orders. Drive Via means that he maintains track speed right until he reaches
the Trackmark then executes his next order.
To issue a Drive To order, highlight the Drive To command with your cursor.
This brings up a new list of Industries. Higlight one of these and another
list appears showing you the various tracks available at that industry
(perhaps only one track is shown if there is only one choice). Click on
the track you wish the Driver to go to and a new icon is added to the
list. Follow this same process for other Commands.
Once you have issued a number of Commands for your Driver, you can then
edit them by dragging the icons around. Drag an icon off the disply window
and release it to delete orders. Drag the order over the green arrow between
two other orders to move an order. R-Click on the green arrow between
two orders to insert an order.
Once you have issued your Commands, save the setup by clicking on the
large green check mark (tick).
To try out your new Session, click on the Driver Quickstart icon at the
top of your screen. If you need to edit the orders further, Escape out
of the Driver Session and edit you list as appropriate.
![]()
![]()
![]()